前言:内部实现、初始化、nil切片和空切片、切片内存分析、子切片、拷贝、扩容、切片传递
一、内部实现
源码地址:runtime/slice.go
切片是一个很小的对象,它对底层的数组(内部是通过数组保存数据的)进行了抽象,并提供相关的操作方法。切片是一个有三个字段的数据结构,这些数据结构包含 Golang 需要操作底层数组的元数据:
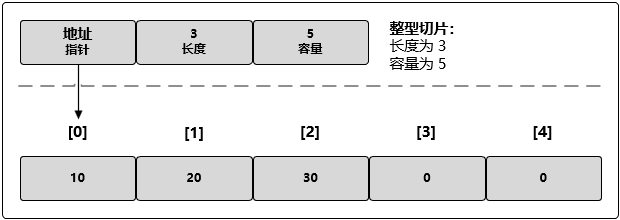
这 3 个字段分别是指向底层数组的指针、切片访问的元素的个数(即长度)和切片允许增长到的元素个数(即容量)。
源码如下
type slice struct {
    array unsafe.Pointer // 数据
    len   int            // 长度(元素个数)
    cap   int            // 容量
}
二、初始化
// 长度和容量都是 5 个元素的切片
slice := make([]int, 5)

// 其长度为 3 个元素,容量为 5 个元素
slice := make([]int, 3, 5)

// 使其长度大于容量,编译报错: len larger than cap in make([]int)
myNum := make([]int, 5, 3)

// 创建并初始化,其长度和容量都是 4 个元素
myNum := []int{10, 20, 30, 40}

// 使用空字符串初始化第 100 个元素
myStr := []string{99: ""}

// 区分切片和数组的初始化方式,如果在 [] 运算符里指定了一个值,那么创建的就是数组而不是切片
// 创建有 3 个元素的整型数组
myArray := [3]int{10, 20, 30}
// 创建长度和容量都是 3 的整型切片
mySlice := []int{10, 20, 30}
创建二维数组
arr := make([][]int, m)
for i := 0; i < m; i++ {
    arr[i] = make([]int, n)
}
三、nil切片和空切片
// 创建 nil 整型切片
var myNum []int

// 使用 make 创建空的整型切片
myNum := make([]int, 0)
// 使用切片字面量创建空的整型切片
myNum := []int{}
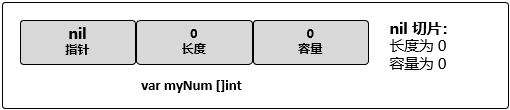
在 Golang 中,nil 切片是很常见的创建切片的方法。nil 切片可以用于很多标准库和内置函数。在需要描述一个不存在的切片时,nil 切片会很好用。比如,函数要求返回一个切片但是发生异常的时候。下图描述了 nil 切片的状态:
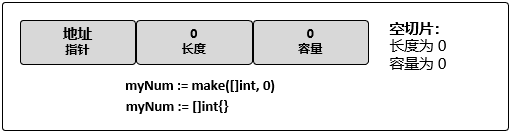
空切片的底层数组中包含 0 个元素,也没有分配任何存储空间。想表示空集合时空切片很有用,
比如,数据库查询返回 0 个查询结果时。下图描述了空切片的状态:
不管是使用 nil 切片还是空切片,对其调用内置函数 append()、len() 和 cap() 的效果都是一样的
注意:所有类型的「空切片」都共享一个内存地址
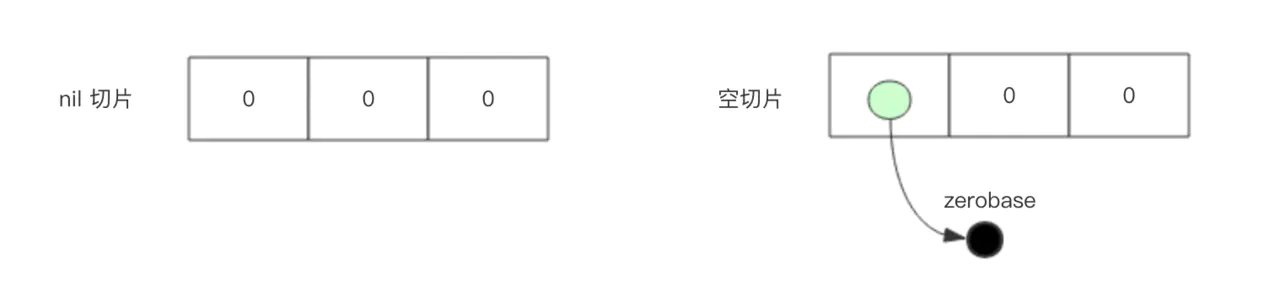
所以为了避免写代码的时候把脑袋搞昏的最好办法是不要创建「 空切片」,统一使用「 nil 切片」,同时要避免将切片和 nil 进行比较来执行某些逻辑。这是官方的标准建议。
The former declares a nil slice value, while the latter is non-nil but zero-length. They are functionally equivalent—their len and cap are both zero—but the nil slice is the preferred style.
前者声明一个nil切片值,而后者是非nil但长度为零的。它们在功能上是等价的,len和cap都为零,但nil切片是首选样式。
「 nil 切片」和「空切片」还有一个极为不同的地方在于 JSON 序列化:
- nil切片–> null
- 空切片–> 空[]
type Something struct {
    Values []int
}
var s1 = Something{}
var s2 = Something{[]int{}}
bs1, _ := json.Marshal(s1)
bs2, _ := json.Marshal(s2)
fmt.Println(string(bs1))
fmt.Println(string(bs2))
---------
{"Values":null}
{"Values":[]}
四、切片内存分析
1、子切片
(1)子切片常见用法
slice[i:]  // 从 i 切到最尾部
slice[:j]  // 从最开头切到 j(不包含 j)
slice[:]   // 从头切到尾,等价于复制整个 slice
// 创建一个整型切片
// 其长度和容量都是 5 个元素
myNum := []int{10, 20, 30, 40, 50}
// 创建一个新切片
// 其长度为 2 个元素,容量为 4 个元素

newNum := slice[1:3]
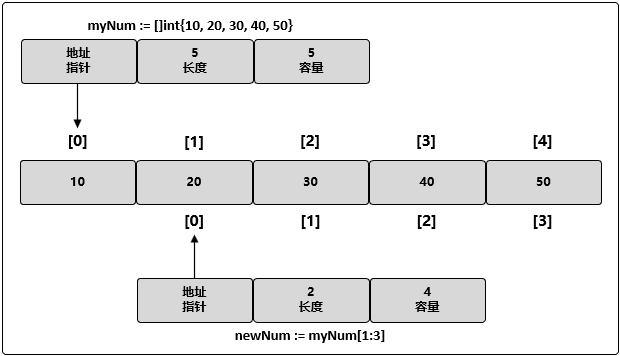
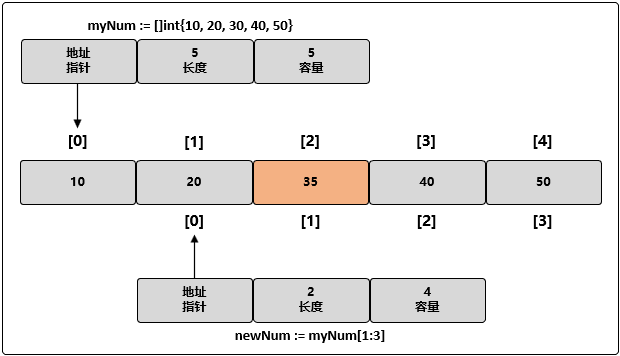
需要注意的是:现在两个切片 myNum 和 newNum 共享同一个底层数组。如果一个切片修改了该底层数组的共享部分
把 35 赋值给 newNum 索引为 1 的元素的同时也是在修改 myNum 索引为 2 的元素:
(2)子切片第三个参数
在创建切片时,使用第三个索引选项引可以用来控制新切片的容量。其目的并不是要增加容量,而是要限制容量。
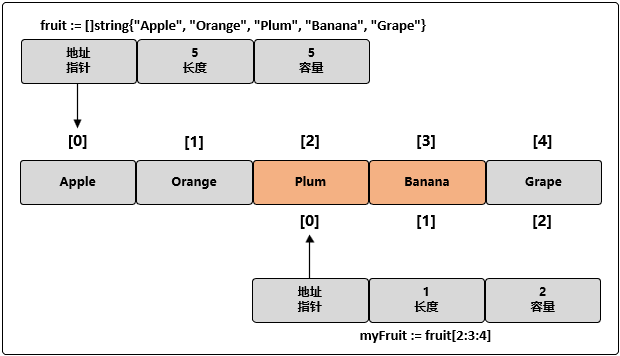
// 创建长度和容量都是 5 的字符串切片
fruit := []string{"Apple", "Orange", "Plum", "Banana", "Grape"}
// 将第三个元素切片,并限制容量
// 其长度为 1 个元素,容量为 2 个元素
myFruit := fruit[2:3:4]
这个切片操作执行后,新切片里从底层数组引用了 1 个元素,容量是 2 个元素。具体来说,新切片引用了 Plum 元素,并将容量扩展到 Banana 元素:
如果设置的容量比可用的容量还大,就会得到一个运行时错误:
myFruit := fruit[2:3:6]
panic: runtime error: slice bounds out of range
内置函数 append() 在操作切片时会首先使用可用容量。一旦没有可用容量,就会分配一个新的底层数组。这导致很容易忘记切片间正在共享同一个底层数组。一旦发生这种情况,对切片进行修改,很可能会导致随机且奇怪的问题,这种问题一般都很难调查。如果在创建切片时设置切片的容量和长度一样,就可以强制让新切片的第一个 append 操作创建新的底层数组,与原有的底层数组分离。这样就可以安全地进行后续的修改操作了:
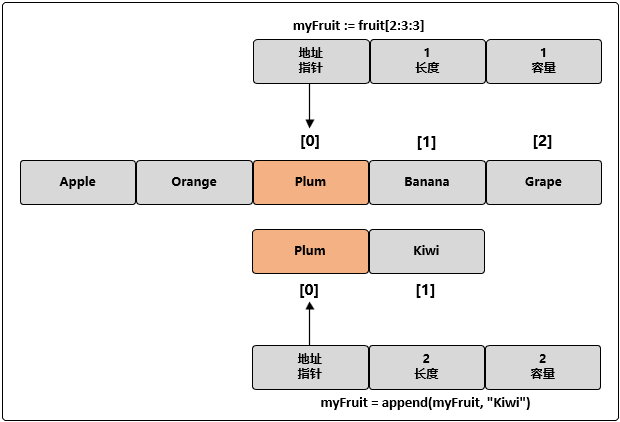
myFruit := fruit[2:3:3]
// 向 myFruit 追加新字符串
myFruit = append(myFruit, "Kiwi")
这里,我们限制了 myFruit 的容量为 1。当我们第一次对 myFruit 调用 append() 函数的时候,会创建一个新的底层数组,这个数组包括 2 个元素,并将水果 Plum 复制进来,再追加新水果 Kiwi,并返回一个引用了这个底层数组的新切片。因为新的切片 myFruit 拥有了自己的底层数组,所以杜绝了可能发生的问题。我们可以继续向新切片里追加水果,而不用担心会不小心修改了其他切片里的水果。可以通过下图来理解此时内存中的数据结构:
将一个切片追加到另一个切片
内置函数 append() 也是一个可变参数的函数。这意味着可以在一次调用中传递多个值。如果使用 … 运算符,可以将一个切片的所有元素追加到另一个切片里:
// 创建两个切片,并分别用两个整数进行初始化
num1 := []int{1, 2}
num2 := []int{3, 4}
// 将两个切片追加在一起,并显示结果
fmt.Printf("%v\n", append(num1, num2...))
输出的结果为:
[1 2 3 4]
在返回的新的切片中,切片 num2 里的所有值都追加到了切片 num1 中的元素后面
再来看一个例子:newArr2因为容量超过限制
func Test04(t *testing.T) {
    arr := []int{1,2,3,4,5,6}

    newArr := arr[1:2:3]
    newArr2 := arr[1:2:2]

    newArr = append(newArr, 7)
    newArr2 = append(newArr2, 7)// 创建新的底层数据

    arr[1] = 0
    fmt.Println(arr,newArr,newArr2) // [1 0 7 4 5 6] [0 7] [2 7]

}
2、拷贝
Golang 内置的 copy() 函数可以将一个切片中的元素拷贝到另一个切片(内存级别拷贝)中,其函数声明为:
func copy(dst, src []Type) int
它表示把切片 src 中的元素拷贝到切片 dst 中,返回值为拷贝成功的元素个数。如果 src 比 dst 长,就截断;如果 src 比 dst 短,则只拷贝 src 那部分:
func Test03(t *testing.T) {
    arr := []int{1, 2, 3, 4, 5}

    arrSub := arr[3:]
    arrCopy := make([]int,len(arr))
    copy(arrCopy, arr)

    arr[4] = 0
    fmt.Println(arr, arrSub, arrCopy) // [1 2 3 4 0] [4 0] [1 2 3 4 5]
}
3、扩容
扩容分为两种:原切片扩容,子切片扩容
(1)原切片扩容
扩容原则:
- 旧容量 old.cap 小于 1024 时,扩容为旧容量 old.cap 的 2 倍;
- 旧容量 old.cap 大于等于 1024 时,按照旧容量 old.cap 的 1.25 倍指数幂增长;
- 期望容量 cap 大于旧容量 old.cap 的 2 倍时,直接采用 期望容量cap;
- 当计算容量溢出时,直接采用期望容量 cap 的值
源码如下:
// growslice handles slice growth during append.
// It is passed the slice element type, the old slice, and the desired new minimum capacity,
// and it returns a new slice with at least that capacity, with the old data
// copied into it.
// The new slice's length is set to the old slice's length,
// NOT to the new requested capacity.
// This is for codegen convenience. The old slice's length is used immediately
// to calculate where to write new values during an append.
// When the old backend is gone, reconsider this decision.
// The SSA backend might prefer the new length or to return only ptr/cap and save stack space.
//
// slice 在追加数据时使用 growslice 处理容量增长
// 入参:slice 元素类型,旧 slice,期望容量
// 返回:新 slice
func growslice(et *_type, old slice, cap int) slice {
    if raceenabled {
        callerpc := getcallerpc()
        racereadrangepc(old.array, uintptr(old.len*int(et.size)), callerpc, funcPC(growslice))
    }
    if msanenabled {
        msanread(old.array, uintptr(old.len*int(et.size)))
    }

    if cap < old.cap {
        panic(errorString("growslice: cap out of range"))
    }

    if et.size == 0 {
        // append should not create a slice with nil pointer but non-zero len.
        // We assume that append doesn't need to preserve old.array in this case.
        return slice{unsafe.Pointer(&zerobase), old.len, cap}
    }

    newcap := old.cap
    doublecap := newcap + newcap
    // 期望容量 cap 超过旧容量 2 倍时,直接使用 cap 作为新 slice 的容量
    if cap > doublecap {
        newcap = cap
    } else {
        // 就容量小于 1024 时,空间按 2 倍增长
        if old.len < 1024 {
            newcap = doublecap
        } else {
            // Check 0 < newcap to detect overflow
            // and prevent an infinite loop.
            // 新容量以 (1 + 1 / 4) 倍率增加,直到大于期望容量
            for 0 < newcap && newcap < cap {
                newcap += newcap / 4
            }
            // Set newcap to the requested cap when
            // the newcap calculation overflowed.
            // 防止溢出
            if newcap <= 0 {
                newcap = cap
            }
        }
    }

    var overflow bool
    var lenmem, newlenmem, capmem uintptr
    // Specialize for common values of et.size.
    // For 1 we don't need any division/multiplication.
    // For sys.PtrSize, compiler will optimize division/multiplication into a shift by a constant.
    // For powers of 2, use a variable shift.
    // 计算新容量
    switch {
    case et.size == 1:
        lenmem = uintptr(old.len)
        newlenmem = uintptr(cap)
        capmem = roundupsize(uintptr(newcap))
        overflow = uintptr(newcap) > maxAlloc
        newcap = int(capmem)
    case et.size == sys.PtrSize:
        lenmem = uintptr(old.len) * sys.PtrSize
        newlenmem = uintptr(cap) * sys.PtrSize
        capmem = roundupsize(uintptr(newcap) * sys.PtrSize)
        overflow = uintptr(newcap) > maxAlloc/sys.PtrSize
        newcap = int(capmem / sys.PtrSize)
    case isPowerOfTwo(et.size):
        var shift uintptr
        if sys.PtrSize == 8 {
            // Mask shift for better code generation.
            shift = uintptr(sys.Ctz64(uint64(et.size))) & 63
        } else {
            shift = uintptr(sys.Ctz32(uint32(et.size))) & 31
        }
        lenmem = uintptr(old.len) << shift
        newlenmem = uintptr(cap) << shift
        capmem = roundupsize(uintptr(newcap) << shift)
        overflow = uintptr(newcap) > (maxAlloc >> shift)
        newcap = int(capmem >> shift)
    default:
        lenmem = uintptr(old.len) * et.size
        newlenmem = uintptr(cap) * et.size
        capmem, overflow = math.MulUintptr(et.size, uintptr(newcap))
        capmem = roundupsize(capmem)
        newcap = int(capmem / et.size)
    }

    // The check of overflow in addition to capmem > maxAlloc is needed
    // to prevent an overflow which can be used to trigger a segfault
    // on 32bit architectures with this example program:
    //
    // type T [1<<27 + 1]int64
    //
    // var d T
    // var s []T
    //
    // func main() {
    //   s = append(s, d, d, d, d)
    //   print(len(s), "\n")
    // }
    if overflow || capmem > maxAlloc {
        panic(errorString("growslice: cap out of range"))
    }

    var p unsafe.Pointer
    if et.ptrdata == 0 {
        p = mallocgc(capmem, nil, false)
        // The append() that calls growslice is going to overwrite from old.len to cap (which will be the new length).
        // Only clear the part that will not be overwritten.
        memclrNoHeapPointers(add(p, newlenmem), capmem-newlenmem)
    } else {
        // Note: can't use rawmem (which avoids zeroing of memory), because then GC can scan uninitialized memory.
        p = mallocgc(capmem, et, true)
        if lenmem > 0 && writeBarrier.enabled {
            // Only shade the pointers in old.array since we know the destination slice p
            // only contains nil pointers because it has been cleared during alloc.
            bulkBarrierPreWriteSrcOnly(uintptr(p), uintptr(old.array), lenmem)
        }
    }
    // 复制旧数据
    memmove(p, old.array, lenmem)

    return slice{p, old.len, newcap}
}
(2)子切片扩容
myNum := []int{10, 20, 30, 40, 50}
// 创建新的切片,其长度为 2 个元素,容量为 4 个元素
newNum := myNum[1:3]
// 使用原有的容量来分配一个新元素
// 将新元素赋值为 60
newNum = append(newNum, 60)
执行上面的代码后的底层数据结构如下图所示:
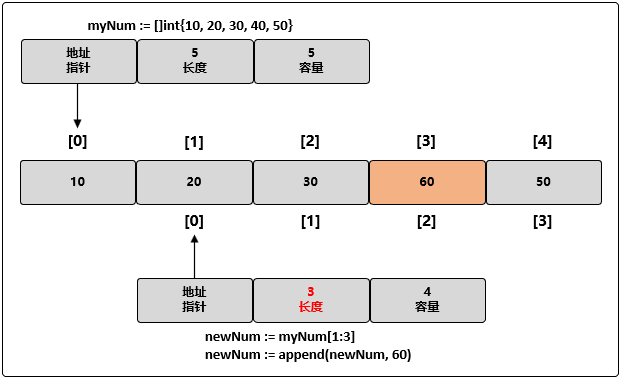
此时因为 newNum 在底层数组里还有额外的容量可用,append() 函数将可用的元素合并入切片的长度,并对其进行赋值。由于和原始的切片共享同一个底层数组,myNum 中索引为 3 的元素的值也被改动了。
4、切片传递
先来看一下切片创建时的源码,切片返回的是一个指针类型,因此在函数间传递切片时,复制时只会复制切片本身,不会涉及底层数组
// 创建 slice
func makeslice(et *_type, len, cap int) unsafe.Pointer {
    mem, overflow := math.MulUintptr(et.size, uintptr(cap))
    if overflow || mem > maxAlloc || len < 0 || len > cap {
        // NOTE: Produce a 'len out of range' error instead of a
        // 'cap out of range' error when someone does make([]T, bignumber).
        // 'cap out of range' is true too, but since the cap is only being
        // supplied implicitly, saying len is clearer.
        // See golang.org/issue/4085.
        mem, overflow := math.MulUintptr(et.size, uintptr(len))
        if overflow || mem > maxAlloc || len < 0 {
            panicmakeslicelen()
        }
        panicmakeslicecap()
    }

    return mallocgc(mem, et, true)
}
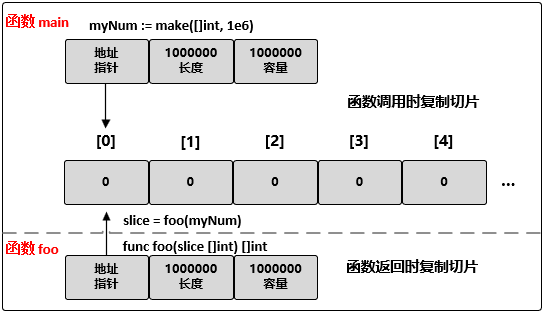
来看一个例子:
myNum := make([]int, 1e6)
// 将 myNum 传递到函数 foo()
slice = foo(myNum)
// 函数 foo() 接收一个整型切片,并返回这个切片
func foo(slice []int) []int {
...
return slice
}
在 64 位架构的机器上,一个切片需要 24 字节的内存:指针字段需要 8 字节,长度和容量字段分别需要 8 字节。由于与切片关联的数据包含在底层数组里,不属于切片本身,所以将切片复制到任意函数的时候,对底层数组大小都不会有影响。复制时只会复制切片本身,不会涉及底层数组:
参考资料:
- https://www.cnblogs.com/sparkdev/p/10704614.html